

How a Central Vacuum Works
How does a Central Vacuum System Work?
BEAM Central Vacuum Systems use specifically designed tubing installed in the walls of your home to carry 100% of the contacted dirt, dust, and allergens away from living area to the central power unit commonly located in the garage, utility room or basement.
To activate the system, simply insert the lightweight hose into a central vacuum wall inlet valve. Most homes will typically have one central vacuum inlet valve per floor averaging three per house. The flexible lightweight hose and inlet system allow you to easily move from room to room without having to push a heavy upright vacuum or pull a canister vacuum behind you, commonly bumping into walls or valuable furniture.
BEAM Central Vacuum Systems are much quieter than portable vacuums as the power unit of a central vacuum is located outside of the living area, where the motor of a portable vacuum is in the same room you clean.
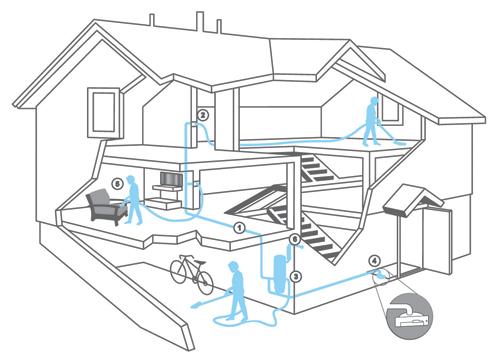
- 1. Tubing installed through interior walls, attic, basement and crawlspaces connects vacuum inlets to the power unit.
- 2. Each strategically located inlet valve lets you vacuum approximately 700-900 square feet at a time.
- 3. The power unit is located away from the living area, usually in a basement, garage or ventilated utility room.
- 4. Innovative accessories like the VacPan can be incorporated into the system for additional cleaning ease.
- 5. A variety of cleaning attachments such as a crevice tool, dusting tool, and fabric tool allows you to vacuum any type of surface.
Professional installation or do-it-yourself. New or existing homes.
A BEAM Central Vacuum System can be installed in your new or existing home in just hours — with no mess and no disturbance to your walls. There's no outside venting required. Average cost for a complete system, installed, starts at around $1,200.
New Home Installation
If you’re building a new home or planning to, ask your builder to include a BEAM Central Vacuum System. You’ll want to discuss locations for the power unit/dirt collection canister, the vacuum inlets (where the hose is inserted), and a place to store a hose and attachment kit on each level. Simply enlarging a closet or including an extra base cabinet is all it takes.
If your builder is familiar with BEAM, they may suggest a VacPan® automatic dustpan in the kitchen, near exterior doors, in family or laundry rooms, or wherever you’re planning hard-surface floors.
Installation of your BEAM system is done after plumbing and electrical work is completed and before drywall is installed. Average cost for a complete system, installed, starts at around $1,200.
Or, you may opt to install your BEAM Central Vacuum system on your own. Check out the Do-It-Yourself installation section below for step-by-step instructions.

Existing Home Installation
About 95% of existing homes — regardless of age — can be retrofitted with a BEAM Central Vacuum System. The key to success is planning a pipe system with a minimum number of inlets and elbows (turns in the pipe) to keep labor time and costs at a minimum while still giving you the vacuum cleaning flexibility only a central vacuum system offers.
If you’re remodeling now, or planning to, a quick call to Beam of St. Louis will allow you to add a BEAM central vacuum system to your plans inexpensively. Beam of St. Louis provides professional installation by trained, experienced installers — an important advantage in a system you’ll be using for perhaps the next 25 years.

Do-It-Yourself: Step By Step
Step 1
Choose And Personalize Your System:
Select the BEAM Central Vacuum System, cleaning package, and accessories that best suit your home and cleaning needs. For the ultimate in ease, add a VacPan automatic dustpan in kitchen, mudroom or bath. Calculate the number of inlets you’ll need.
Step 2
Where To Place The Inlets:
One inlet can serve an area of about 700 to 900 square feet For more power, the fewer the inlets used the better. And be sure the hose will reach from the inlet valve to all corners (and around furniture) in the rooms you want to vacuum. Do not install inlet valves in a wall where there is a pocket door or behind a door. If you prefer, inlets can be installed in the floor.
Step 3
Planning The Piping Installation:
Plan the piping installation from the BEAM power unit to the inlet valves. It’s best to run the piping under the floor if possible. In structures without basements, the piping may be run through the attic or crawlspaces. In an existing two-story or three-story home, vacuum piping may be run to upper levels through cold air ducts, through the back of closets or under stairways, or beside a soil pipe. In new structures, pipe can be run through wall studs before drywall is applied. Be sure to plan where to locate the BEAM power unit — usually in the garage or basement.
Helpful Tips:
Use a tubing cutter for cleaner cuts.
Use 2-1/4″ wood boring bit similar to a Forstner bit.
Rent a right-angle drill if you do not have one.
Tools You'll Need:
- Drywall saw (optional)
- Electrical tape/duct tape/cable ties
- Electric drill – 1/2″ (1.3cm) with right-angle head if possible
- Flashlight
- Forstner wood-boring bit – 2-1/4″ (5.7cm)
- Hammer
- Hole saw or cutter – 2-1/4″ (5.7cm)
- Masonry bit – 2-1/4″ (5.7cm) (optional)
- Metal coat hangers
- Pencil
- Pipe/tubing cutter or hacksaw and miter box
- Safety goggles
- Screwdrivers (Phillips and flat blade)
- Steel tape measure
- Stud finder
- Utility/razor knife
- Wire stripper/cutter
- Wood chisel
- 30′ (9.15cm) piece of cord or string
Step 4
Installing The Inlet Valves:
To install an inlet valve in existing construction, start by finding the center of the bottom plate of the wall. Then from the basement use the hole saw to drill a hole up into the wall cavity. (Remember to wear safety goggles throughout the installation process.)
There is a simple way to find the center of a wall. Using a section of wire cut from a coat hanger, drill a pilot hole through the carpet or hard surface floor. Drill as close to the wall as possible — pointing the drill bit at a 45-degree angle.
In the basement, see where the coat hanger has come through. Measure over from the coat hanger to find the center of the bottom of the wall plate. Using the hole saw, drill a hole into the wall cavity.
Using the flashlight, and/or broom handle, check to see that the wall cavity is free from obstructions to the desired height of the inlet valve — before cutting a hole in the wall. Then, on the wall, center a mark above the pilot hole made by the coat hanger. This will be the center of your inlet valve.
Center the wall inlet bracket, trace the outline, then cut a hole in the wall. Attach the wall bracket to an elbow of pipe.
Connect the low voltage wire to the inlet valve stem. Attach a small weight to the opposite end of the wire and feed the wire through the hole to the basement. Insert the inlet valve and bracket into the wall. Mount the inlet valve so the valve folds down to open.
Installing inlet valves in new construction follows the same basic procedures.
Step 5
Installing Pipes:
Measure the length of the pipe, making sure your cuts are straight and clean. Use a sharp knife or sandpaper to eliminate burrs that might collect dust or hair that could form a dirt trap. Starting with the inlet valve farthest from the power unit, begin test fitting then gluing together sections of piping. Join sections of piping to the main trunk line which ties into the BEAM power unit. Splice together the low voltage wires along the trunk line. Run and connect the trunk line to the BEAM power unit. If mounting the power unit in the garage, drill a pilot hole through the wall using a wire coat hanger to check location and for obstructions. Then cut a 2 1/2″ hole though the wooden joist above the masonry wall between the basement and the garage. Feed piping into garage to unit.
Step 6
Installing The Power Unit:
Mount the BEAM power unit using detailed instructions included with it. Strip the ends of the low voltage wire coming into the garage and connect them to the power unit. Plug the power unit into an electrical outlet, flip the manual override switch on/off to test it. Then plug in the lightweight hose to clean up any minor mess you may have made installing the inlets.
Congratulations! You’re on your way to a cleaner, healthier home!